What is Beeswax?
Beeswax is a powerful natural wax that is used to improve our lives. Beeswax is a powerful natural wax that is used to improve our lives. The wax is secreted by honeybees and is used by them for constructing the honeycomb. Beeswax is typically colorless when first secreted but takes on a yellow or brownish color after bits of pollen, propolis, and other matter becomes mixed in.
Worker bees produce beeswax from special glands on their bodies. Brand new wax is clear, but turns opaque after being chewed and molded by bees. They add tiny bits of pollen and nectar to the wax as they handle it. The color of beeswax can vary from nearly white to even black, but most beeswax is a shade of yellow. White beeswax sold commercially consists of yellow beeswax that has been subjected to bleaching or has been filtered to remove impurities.
"Beeswax contains 284 different compounds, including fatty acids, hydrocarbons, and esters. It is hard when cold, and soft and pliable when warmed. An interesting thing about beeswax is that it does not spoil"
It is estimated that a bee consumes 6 to 10 pounds (3 to 4.5 kg) of honey for each pound of the wax that it secretes in small flakes from glands on the underside of its abdomen.
When beekeepers uncap or break honeycombs or have unusable combs, they try to salvage the beeswax. First, they recover as much honey from the combs as possible by drainage or extraction. Then they place the material in water heated to slightly over 145 °F (63 °C). This melts the wax, which rises to the surface. After it cools and hardens, the cake of wax is removed and refined for reuse in comb foundation.
Beeswax plays a role in our Health, Beauty & Skin care, and in the Workshop
and more. For some projects, All you need is Beeswax Block to get started!
...
Benefits of Beeswax to Health?
Relieves Pain and Is Anti-Inflammatory
As medicine, beeswax has been studied in the use of relieving pain and inflammation and has mild anti-swelling effects. A 2014 study published in the Korean Journal of Internal Medicine reports that it was used to helped relieve inflammation caused by osteoarthritis. All randomized patients completed the study, and 23 experienced a reduction in pain, joint stiffness and physical function.
Protects the Liver
In 2013, the Korean Journal of Internal Medicine published a study that investigated the alcohols found in honeycomb and if their antioxidant effects helped protect the liver. Researchers conducted the study using a mixture of beeswax alcohol to evaluate the safety and effectiveness in people with fatty liver disease. The study was conducted for a period of 24 weeks, finding that it helped normalize liver function and improve symptoms of fatty liver.
Lowers Cholesterol Levels
Research reports that very long-chain fatty alcohols obtained from plant waxes have been reported to lower cholesterol in humans. The nutritional or regulatory effects produced by wax esters or aliphatic acids and alcohols found in unrefined cereal grains, beeswax and many plant-derived foods lower low-density lipoprotein (“bad”) cholesterol by 21 percent to 29 percent and raise high-density lipoprotein (“good”) cholesterol by 8 percent to 15 percent.
Here are some of Honey and Cocoa's favorite Beeswax uses and products:
...
Beeswax Uses for the Home
1. Beeswax Candles for Air Purification
Did you know that beeswax candles are a natural air-purifier? They work through a process called negative ionization.
How to make Beeswax Candles (Courtesy of DIYNatural)
Ingredients/Supplies
- 12 oz. beeswax, roughly chopped (find it at our online store here
- 12 oz. organic palm oil/shortening or coconut oil
- mason jars ( 4 half-pint jars with this recipe)
- square braided cotton #4 or #6 wicks wick
- kitchen scale – for weighing ingredients
- wooden skewers (cut in half) or pencils – to keep wicks in place
- newspaper for covering work areas
-
large glass measuring cup for melting ingredients (4 cup Pyrex one)
Method
1. Using a kitchen scale, measure 12 oz. of beeswax in your large glass measuring cup. Place this measuring cup into a pan filled with a few inches of water. Melt beeswax over medium heat. (Do not heat your beeswax over high heat or it could ignite.)
2. Cut wicks that will be at least a few inches taller than the jars you’re using while your beeswax melts. Once the beeswax begins melting you can carefully dip one cut wick in the wax. After dipping, carefully lay the wick on a sheet of newspaper, holding one end with your fingers, and straightening it out by holding the other end down with a skewer and gently pulling it. Repeat with all the wicks. Allow wicks to dry.
3. Using your kitchen scale, weigh palm oil and set aside. Add palm oil to mostly melted beeswax and stir while it finishes melting.
4. When beeswax/palm oil mixture melts, stir carefully with a skewer. Pour about ½ inch of hot wax into the bottom of one jar, then immediately place a wick into the center of the jar so it just touches the bottom. Hold wick in place gently until wax hardens enough for the wick to stand on its own. Set aside to harden completely. Repeat this step with all your jars.
5. Rest a skewer on top of each jar, gently wrap the wick around the skewer, and make sure it’s positioned straight. With wicks secured, finish pouring hot wax into each jar; and leave headspace at the top. Set aside to cool and harden completely (12 – 24 hours).
6. Cut wicks, leaving them ¼ – ½ inch long.
7. Light and enjoy your beautiful new candles! (You may have to hold a flame over the wick a little longer to light a beeswax candle. This is normal.)
Don't
have all the ingredients check out these beautiful scented homemade beeswax and coconut oil candles to buy and enjoy.

2. Beeswax Organic Reusable Foodwraps
How to make Beeswax Food wraps for a plastic-free Kitchen)
https://www.bhg.com/crafts/easy/beeswax-food-wraps/
Tools
- Pinking Shears
- Saucepan
- Glass
- Chip Brush
Materials
- Cotton Fabric
- Beeswax (Buy it Here)
- Pine
- Jojoba
- Kraft
- Parchment Paper
Step 1 Prep fabric wraps
Choose a fabric you like and use pinking shears to cut it into the desired size and shape. When choosing shapes, think about what you'll be using the wrap for; circular wraps work best for covering stored leftovers in the fridge, while square or rectangular pieces make it easy to wrap up a sandwich for lunch. Be sure to cut the fabric a few inches larger than the surface you want to cover; if you're covering a bowl that's 6 inches in diameter, we recommend cutting an 8-inch circle.
Since you don't need much fabric for these (and they don't all have to match!), this is a great way to use scraps. If you plan to compost the fabric later, use all-natural or 100 percent cotton fabric.
Step 2 Melt wax
Adding a layer of beeswax to your wraps will give the fabric a naturally water-resistant coating that won't absorb food or moisture. To add beeswax to your fabric wraps, you'll need to melt it first. Fill a saucepan half full with water and place the glass jar in the pan. Add 3 tablespoons of pine resin and 4 tablespoons (or 2 ounces) of beeswax. The pine resin helps the wrap stick to food and storage containers. We found beeswax pellets were easiest to measure and use but you can also buy beeswax bars. Simply grate the bars and measure the shavings.
On medium heat, melt the resin and wax, stirring occasionally. After the mix has melted, add 1 teaspoon jojoba oil and stir. This helps keep your wraps pliable. Remove from heat and move immediately to the fabric. This mixture will cover about 24 square inches of fabric.
Step 3 Add Wax to Fabric
When the beeswax mixture is melted and fully combined, prepare to brush it on to each fabric wrap. Prepare your work surface by laying down a large sheet of crafts paper and then place a large sheet of parchment paper on top of it. Lay out your fabric wrap on the parchment paper.
Brush the wax mixture onto the fabric. If the mixture hardens while you're brushing the wraps, simply return it to the heat until it has re-melted. Once covered, lay an extra piece of parchment over the fabric and iron over the parchment paper on medium heat. Push the wax around until it's evenly distributed over the fabric.
When you're done ironing, peel the top layer of parchment paper off and carefully remove the waxed fabric from the bottom layer of parchment paper. Let the wrap cool and wait until it is completely dry before using.
Step 4 Wrap and Store Food
When your wraps are cool and dry, you can use them to store or wrap food items. The warmth of your hands will soften the wraps so you can form it for a good seal on any shape container or foods in your lunch box.
You can use these reusable food wraps with most food items, but be sure they never come in contact with raw meat. They're simple to wash too; just use lukewarm water and soap. Let them dry completely after each wash. You'll be able to use each wrap between 100-150 times before they'll need to be replaced.
Don't have all the tools or ingredients, we can help! Check out these amazing designs and DIY creator kit to play and make your very own!!!
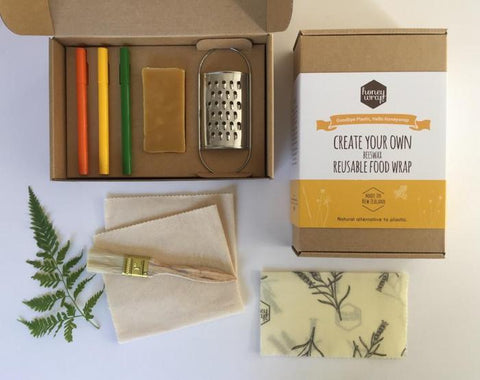
Latitude 42 reusable natural beeswax food wraps are the perfect natural alternative to plastic wrap. Using our own beeswax combined with a natural resin and jojoba oil these wraps keep your food fresh while being environmentally friendly. Available at our online store in different packs and sizes Here
...
3. Beeswax for Furniture and Wood Polish
Furniture polish of all kinds can contain lovely oils and waxes that help hydrate and protect. Most types also contain petrochemicals and other solvents that can get eaten accidentally (little ones) or evaporate into the air. In this recipe, just two main ingredients, beeswax, and olive oil, and make it in less than 30 minutes. It takes a couple of hours to cool but can be used immediately after. When combined, these simple oils form a semi-hard wax that you can massage into most any wood to restore a beautiful sheen.
Beeswax & olive oil are all you need!
A beautifully scented and natural beeswax furniture polish suitable for most wood types.
Makes about 3-2/3 cups
150g (2/3 cup) Beeswax (Can be purchased Here)
600g (3 cups) Olive oil*
30 drops Anti-oxidant such as clear Grapefruit Seed Extract or Vitamin E (optional)
10 drops Essential oil Woodsy Essential oil blend or Lavender Essential oil (optional)
Instructions on making natural beeswax furniture polish
1. Place both the beeswax and the olive oil into a double boiler such as demonstrated in the image below. You can make a double boiler by floating a saucepan inside another pan filled with hot water. You want your oils heated indirectly and evenly in this way because it’s safer for you and helps maintain the integrity of the ingredients.
2. Heat the double boiler/pans on medium heat until the beeswax is melted. Stirring it will help speed things up but don’t be tempted to turn your heat up too high. There’s a chance that boiling water will splash into your oils.
3. Add the optional anti-oxidant and essential oil and stir well. Pour the hot mixture into clean and dry wide-mouth containers.** Allow to cool for at least two hours into a semi-hard balm consistency
4. You can use the polish immediately and no doubt you’ll do what I did…run around the house looking for wooden objects to beautify! To use the polish, just scoop some of it out with your fingers or with a rag and work the polish into any and all wooden surfaces. You can wipe excess polish off immediately or leave it on for a couple of hours. That gives more time for the oils to permeate the wood. Buff it to a sheen afterward and you’ll be delighted with how gorgeous the wood looks.
Enjoy your 100% natural and toxin-free polish ~ your furniture certainly will
Beeswax for Healthier Skin and Hair
1. All Natural Beeswax Lip Balm

This recipe makes about 45 grams, enough to fill two ¾- to 1-ounce lip balm tins or about 10 standard-size lip-balm tubes.
Ingredients
10 grams beeswax
5 grams shea butter
5 grams coconut oil
10 grams food-grade castor oil
10 grams sweet almond oil
10 drops vitamin e oil
7 drops peppermint essential oil
3 drops lemon essential oil
3 drops bergamot essential oil
Instructions
In a small double boiler, or in the microwave set at medium-low power, melt the beeswax, shea butter, and coconut oil together.
Add the castor and sweet almond oils, vitamin E, and essential oils to the melted beeswax mixture and stir to combine. Rewarm if needed to keep the balm warm and liquid.
Pour the liquid balm into small, shallow tins or clean lip balm tubes. The balm will last for at least 6 months, though the essential oil scent may fade over time.
To use, rub lightly over dry or chapped lips as often as needed.
Au Lip balm is
our best selling lip balm our customer love and a little goes along way

This antibacterial lip balm is designed for use on dry lips, abrasions and burns, and is formulated with Active 16+ Manuka honey, beeswax and sunflower oil. It’s 100% natural and deeply nourishing, soothing and moisturising.
2. Homemade Beeswax and Honey Soap

Why add beeswax to soap?
Beeswax has a few effects on soap. They are similar to the effects of shea butter or mango butter, but more pronounced. First, since it has a high melting point and returns to a solid form quickly, it makes the soap harder. This means that while you are soaping it will start solidifying right away, which is a negative. But in your finished bar, it will keep its shape well and will show the details of the mold you use. Any recipe containing beeswax is best made in individual bar molds, because it will be very hard to cut after curing.
Like any oil, butter, or wax added to soap, beeswax moisturizes the skin. It does an especially good job this because so much of it can’t be saponified, or turned into soap why adding lye. There is a lot of leftover beeswax in the finished bar that stays in its natural state and moisturizes the skin.
Beeswax will also reduce the lather of your soap. Well… more like make the bubbles smaller. You won’t get big, dramatic lather like you do with my shower soap recipe. I typically use this recipe for hand soap because it is so cute and also because the lather is not as great.
If you are using local beeswax that comes in a bar form, you will want to break it into smaller pieces to help it melt down. If you are buying it, pellet form is the easiest to work with.
Why add honey to soap?
Honey adds moisture to the skin and the natural sugar increases lather. (This somewhat counteracts the lather decreasing properties of the beeswax.). It also colors the soap a tiny bit.
Its main effect on soap is heating it. For whatever reason, any sugar added to a soap batter cause it to heat up tremendously. All soap batter heats up, occasionally enough that it “gels”, or gets extra hot and translucent, altering the colors. But any soap recipe with honey will almost always gel. DO NOT put it in the oven to force gel phase.
Making this recipe in a loaf mold will cause all the heat to build and increase the chances of a soap overflow from too much heat. That is another reason that this recipe is best made in Individual molds. Place them in the freezer for 3-4 hours immediately after pouring and have not had any trouble.
Ingredients
- 2 ounces sweet almond oil
- 2 ounces avocado oil
- 11 ounces coconut oil
- 9 ounces olive oil
- 9 ounces palm oil
- 2 ounces beeswax
- 1 tablespoon honey
- 2.5 tablespoons Pure Honey fragrance oil (optional)
- 4.94 ounces of lye
-
9–13 ounces of water
Instructions
1. Measure out your lye and water in separate containers, using the digital scale. Add the lye to the water (snow floats on the lake), stir to dissolve. Set aside in a safe place to cool.
2. Measure out the oils and beeswax and heat to 160 degrees, until fully melted.
3. Allow to cool. Wait until the lye and oils have cooled down to around 110. At this temperature, some of the beeswax may have hardened slightly. If that is the case, melt again briefly for a minute, but don’t fully heat the oils up.
4. Prepare your molds and have your fragrance and honey measured out and ready to go. This recipe will come to trace very quickly and start setting up right away
5. Pour the lye water into the melted oils and blend with your stick blender. Be careful of false trace, as the beeswax cooling can trick you. Stir with the blend for a minute, then by hand, then with the blender again. Once thin trace is reached, add the honey. Then add the fragrance oil one tablespoon at a time and mix in by hand.
Immediately pour the soap batter into a mold. Place the mold, uncovered, in the freezer for about 4 hours to prevent a soap overflow.
6. After 4 hours, remove the soap from the freezer and allow to cure and harden overnight at room temperature. Unmold in the morning. Continue to let the soap dry and harden in a well ventilated area for 3-4 weeks before using.
3. Beeswax for Hair
Beeswax for hair is an ingredient frequented by those who are looking to develop dreadlocks because it helps give the hair a nice firm hold while moisturizing it without a greasy look or feel.
Benefits of Eating Beeswax
As briefly mentioned above, there are many benefits of consuming beeswax. Ingesting beeswax benefits your cholesterol. The long chain fats and alcohols in beeswax has been known to significantly lower bad cholesterol and raise good cholesterol. One study even showed that eating beeswax reduced low density lipoprotein was by over 20%.
Beeswax is also good for your liver. The alcohols in beeswax normalizes liver function, and more importantly, improved symptoms of fatty liver. Researchers have also found that those same alcohols are capable of reducing insulin levels.
The best way to eat beeswax is to eat the honeycomb. Honeycomb is the beeswax cells with honey in them. It is delicious, sweet, and has a pleasant texture. Honeycomb and chunky honey varieties can be purchased online
Here
Share with us how you use Beeswax, we'd love to hear!